Shadertoy - Rain drops
17 Jan 2019 • 0 Comments
Introduction
Today, let’s analyze the effects of raindrops, one of the most visible effects on Shadertoy. The code to analyze is ‘Rain drops on screen’. The comments in the code are meticulous, which helped me to analyze it. So let’s get started.
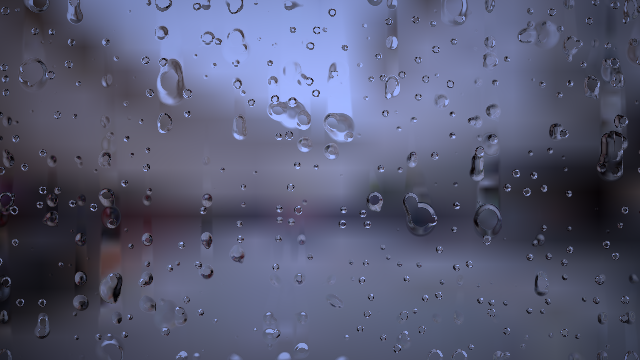
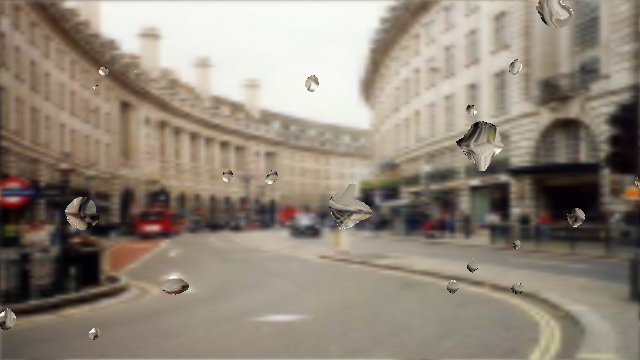 ‘Rain drops on screen’ by eliemichel
Texture input
In Shadertoy - Fire Shader, I wrote that there are no random functions available for inline functions in shader, so we can use random values in two ways. The first is to create a random function like hash directly, and the second is to load a random texture. Let’s try the second method today.
Shadertoy offers a variety of input textures. They can be called iChannel0 ~ iChannel3. Here we simply call it texture0.
In texture2D, the first argument is the texture to display, and the second argument is the texture’s coordinates. The second argument, uv, fixes the pixels in the entire screen in the range of 0.0 to 1.0, so the screen will be completely filled with textures.
If you uncomment line 6, the image will be enlarged. uv range changed from 0.0 ~ 1.0 to 0.0 ~ 0.5, so the bottom left texture is displayed only. If you uncomment line 7, we can see that the image is displayed in a narrow area. But how do we use tiling techniques to fill the rest of the area? We can easily solve this problem by multipling the value we want to repeat for uv, then using fract, which removes the integer part from the real number. Please uncomment line 8 to check.
texture2D can also contain the third argument bias. This is the value added to the mipmap level when calculating the texture’s LOD. If there is no change to 0.0, and you uncomment line 9, 1.5 will be applied as bias and you will see that the image is blurred. The original codealso uses textureLod which gives you direct access to the LOD, but in the OpenGL ES 2.0 specification, textureLod is only available in the vertex shader(related link), we will not use textureLod here because this code is only used to blur the background image.
As mentioned earlier, you can also receive random textures as input.
The above code was created by referring to “Simple Texture Distort” by mikiex. texture0 used the landscape texture used above, and texture1 used a random texture. Using the r channel and the g channel in the texture1 random value, we change the uv value of texture0 to create a distorted effect.
The result of the text looks a bit smoother than the result of the code referenced above. This is due to the difference in random texture used. The code we referenced used a 64x64 random texture, and we used a 256x256 random texture. If we want to see a similar effect to the referenced code, we can uncomment line 7. Because it uses only one-fourth the size of the random texture, it has a similar effect to that of the 64x64 random texture.
So let’s get back to the original code. Line 8 in Rain drops on screen is as follows.
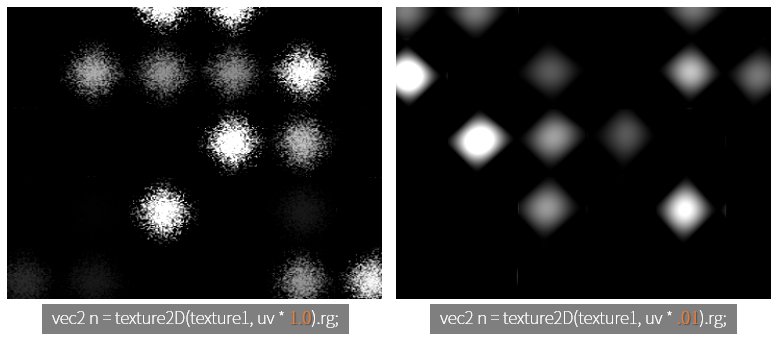
n = texture(iChannel1, u * .1).rg; // Displacement
n is also vec2 n because the vec2 in line 7 is applied. iChannel1 is a random texture. u is uv. You can see this on the screen as below.
If you uncomment line 6, you can see that the original random texture is tight. Line 5 is interpolated using only a small area of the random texture, multiplied by .1.
This calculated n is used in raindrops. Note that if you change the value of .1 to 1.0 in line 8 of original code, or if you completely eliminate the multiplying part, you can see that the raindrops become very small. And on the contrary, if you multiply by a smaller value such as .001, the raindrop will be close to a perfect circle. We will explain why this happens in the next section.
Rain drops
Raindrops are calculated in the for-loop. When you comment out the for-loop, the raindrops disappear and only the blurry background remains. Let’s analyze each one from the first line of the for-loop.
vec2 x = iResolution.xy * r * .015,  // Number of potential drops (in a grid)
     p = 6.28 * u * x + (n - .5) * 2.,
     s = sin(p);
The elements of x in the first part are fixed values except r. iResolution is 640x360 on my computer monitor’s shadertoy window, so multiplying it by r and .015 will result in r = 1, iResolution.x = 9.6, iResolution.y = 5.4.
p is the sum of the two terms. In the first argument 6.28 * u * x, 6.28 is an approximation of \(2 \pi\). u is the uv, and x is the value previously saved. If we calculate roughly, r = 1, the range of the first term will be (0.0,0.0)~(60.288,33.912). Numbers do not show anything special yet.
The second argument (n-.5)*2. is 0.0~1.0 because n range is the color value of the random texture, where -.5 gives -0.5 ~ 0.5, *2. will be -1.0~1.0. It is a smaller value than the first term, but since this value is added every pixel, a non-regular value is created.
In the third line, p takes the sin function and creates a value between -1.0 and 1.0. Let’s check these values in the shader.
In line 8-9 we divided p into two parts. Once you have output the p calculation results of the first term on the r and g channels on the screen, you can see that most of the values are 1 or more as expected when the screen is entirely yellow. If you uncomment line 9, there will be random changes on the left and bottom of the screen, but the screen is still yellow overall.
If you uncomment line 12, you can see that the screen is covered by a grid. As a result of the calculation of the sin function, red and green are regularly displayed as 1.0. The more black part is because the negative part is displayed with the same value as 0.0. If you uncomment line 9 again, you will see that the random value disappears and only a certain grid is displayed.
And if you change the r value from 1.0 to 4.0, which varies from the original for-loop, you can see that the grid gets tighter.
There is no clue as yet. We need to look at the code a bit more.
// Current drop properties. Coordinates are rounded to ensure a
// consistent value among the fragment of a given drop.
vec4 d = texture(iChannel1, round(u * x - 0.25) / x);
round is an inline function that rounds off, but is not supported by the fragment shader of three.js. If we use floor(a+0.5) instead, we can get the same effect. Let’s put this d value in the shader.
If we multiply uv by x, x is a large value, so texture1 will shrink and appear in a small area, and the other part will look like an image stretched. With -0.25 here, the original image will have slightly shifted right-up (uncomment line 8). If we then calculate floor(uv*x-0.25+0.5) to give the effect of the round function you see above, a large grid is created (uncomment line 9). But the same color is displayed in the upper right corner because the value of floor is more than 1.0. To prevent this problem, divide uv by x (uncomment line 10).
If we multiply a number by x, then take floor and then divide by x, we can get integers up to 0, 1, 2, ..., x-1. If we do this in 2D, we can get a grid. Once the grid is formed, it will all have the same value in the grid.
Disappearing rain drops
If we were to prepare the basic materials for raindrops beforehand, the latter will actually draw raindrops. First, we compute t, which adds s.x and s.y of s which we calculated earlier, and then multiplies the complex expression.
float t = (s.x+s.y) * max(0., 1. - fract(iTime * (d.b + .1) + d.g) * 2.);
A complex expression guarantees a minimum value of 0 with max. Since d is a grid, d.b and d.g will have constant values over a large area. Let t be a shader.
When time came in, there was definitely a change. We can see that there is something like a raindrop on each grid and disappears. Since time is multiplied by the value from d, the raindrops on each grid appear and disappear for the same time. The shape of each raindrop is different because the s calculated above is an irregular shape. If we uncomment line 10, we will see a rhombus with no randomness.
Here too, r changes from 1.0 ~ 4.0, and the size of the grid changes. By changing 6.28 multiplied by p, we can see that the size of the raindrops that make up the grid changes. Only when it is 6.28 raindrops are created that fit exactly into the grid.
This is because the cycle of sin is \(2 \pi\). If we keep 6.28 in line 9 and uncomment line 12, we can see that the raindrops are exactly half the grid. Line 12 is to translate the sin function, and changing line 6.28 in line 9 or 10 will change the sin cycle. The smaller the number, the larger the grid, the larger the raindrops, and the smaller the number.
Also, if we change .1 to n to 1.0 or if we change it to .01, we can see that the shape of the raindrop clearly changes. Because .1 is a number that determines how large the area is in the random texture, raindrops become fine with large areas, and random values almost disappear with small areas.
Now we have figured out the shape of the raindrops. In the code, this raindrop is displayed by probability.
// d.r -> only x% of drops are kept on, with x depending on the size of drops
if (d.r < (5.-r)*.08 && t > .5) {
    ...
}
The first condition is d.r < (5.-r) * .08. We used the g and b of the grid from the top, and this time the r channel came out. If the arbitrary value is (5.-r) * 0.8, that is, r=1.0~4.0, it should be less than 0.32 ~ 0.8 to draw raindrops. As we can see above, the smaller the value of r, the larger the grid and the larger the raindrops, the less likely it will be.
The second condition is t > .5. t is the holding time of the raindrops. The only thing that leaves a value larger than .5 is that it will not display raindrops if the value is less than .5. Considering that the raindrops gradually diminish and evaporate quickly when they are below a certain size, this is a plausible implementation.
If we apply this condition and turn it around for-loop, we can see a more plausible raindrop effect.
The raindrops are overlapping to give a more wonderful effect. Only the specific raindrops are displayed by the first condition of the if statement.
So now it’s time to look at normal.
// Drop normal
vec3 v = normalize(-vec3(cos(p), mix(.2, 2., t-.5)));
//fragColor = vec4(v * 0.5 + 0.5, 1.0);  // show normals
Shadertoy - Fire Shader briefly explained what normal is. normal is the direction vector of the surface from the center of the object to the outside. It is used to add detail of the surface and can produce a 3D effect.
The normalize function normalizes the vector. That is, divide each component of the vector by the size of the vector.
The first two terms of v are x, and y is calculated as -cos(p). This will cause the cycle of sin(p) when making the shape of the raindrop to be different from \(\frac{\pi}{2}\).
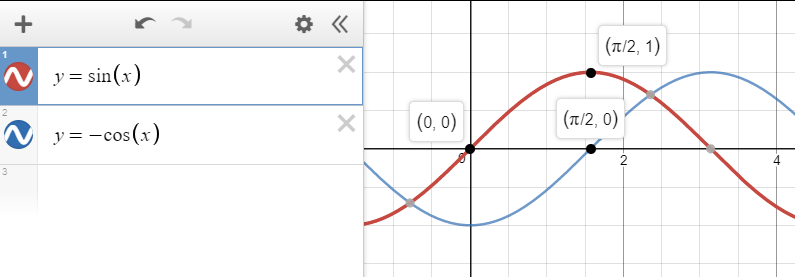
If we compare sin(p) and -cos(p), we can see that the grid positions are shifted from each other.
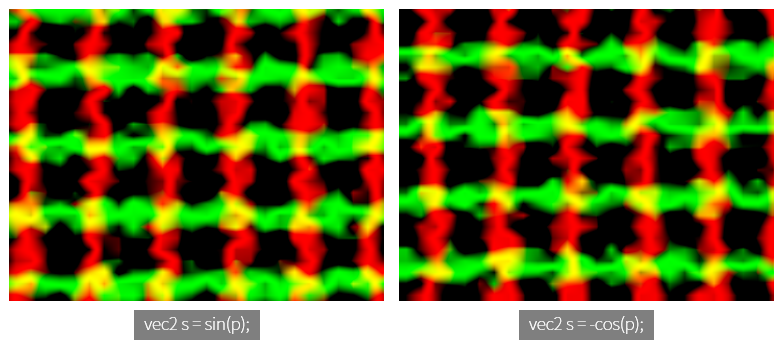
So what is the relationship between sin(p) and -cos(p)? Let’s check with the shader.
If we print sin(p) value to r, g channel, the middle of raindrop will be yellow. That is, sin(p).xy value will show max value close to 1.0.
If we uncomment line 16, we can see the raindrops look more stereoscopic. Since sin(p) and -cos(p) are offset from each other on the grid, a black part with a value of 0.0 is also present.
The third term v is mix(.2, 2., t-.5). When referring to The book of shaders: mix, mix (a,b,c) is the value interpolating the value between a and b by c. That is, \((1-c) \times a + c \times b\). c usually contains a value between 0.0 and 1.0, less than that, more than clip will be. According to this definition, v.z has a value between .2 and 2.0, which is proportional to t-.5. However, here v.z is used only when normalize and has no other meaning. Of course, if v.z is too large, v.x, v.y will be affected by it, and vice versa.
We finally came to the last part. How do we print raindrops with normal like this?
f = texture(iChannel0, u - v.xy * .3);
u is uv. Eventually uv subtracts .3 from normal.xy. Let’s look at the shader to see if this simple implementation will work.
Outside the for-loop, we draw texture0, the background of mipmap plus 1.5. And we apply the raindrop effect in the for-loop. In the first setting, We draw a raindrop effect on line 18, but it only has the effect of sharpening the blurry image as much as the raindrop area.
If we uncomment line 19 to apply normal, we can see raindrops, but they are similar to each other. This is because the coverage area of normal is too wide. If we uncomment line 20, you can see that the whole area of background texture0 is in one raindrop. In the 19th line, it seems to be inverted because we gave the -, and in the 20th line it gives the +, so the background is completely in the raindrop.
Lines 21 and 22 limit this influence by multiplying normal by .3. Try uncommenting and try experimenting with further narrowing or stretching this area.
This will finish the raindrop effect. Thank you for reading the long article.