Shadertoy - 'Creation'
19 Dec 2018 • 0 Comments
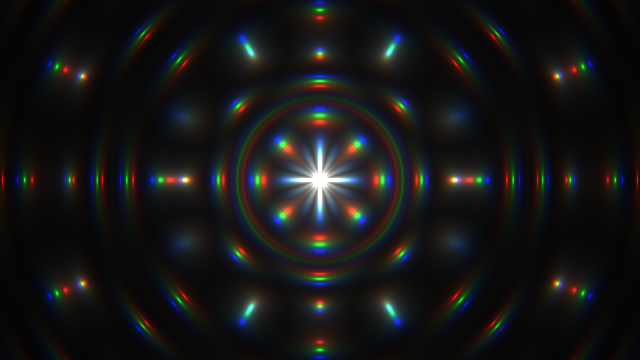 “Creation by Silexars” by Danguafer
Introduction
Today I’m going to analyze one of Shadertoy’s popular shaders, ‘Creation’. If we subtract an annotation, it is a total of 19 lines of short code, but as we can see in the image above, it does not feel as simple.
I unintentionally wrote a very long article on Shadertoy - Fire Shader, so this time I chose a little bit of code to take a break. However, this code is very popular, with Shadertoy receiving 130,000 views (4th overall) and 410 “like” (15th overall). It’s a little tense to analyze this famous code. I will try to analyze each line one by one.
Basic Codes
‘Creation’ on Shadertoy
Lines 4 and 5 are the define part. SShadertoy is also used to store commonly used variables such as \(\pi, \sqrt{2}\), but it can also be used to shrink the code or to further code golf. Code golf is a competitive game that compresses your code to do same things like the shortest length of code. However, if the compression of such code is too great, it may be almost impossible to recognize the code. Here, we will use the code that can be solved when we write sample code by releasing the code as much as possible. I will use time for t and resolution for r.
In line 9 we put z = t. We can use time instead of t.
On line 10 we are running the for loop at i = 0,1,2. The GLSL Fragment shader used by Shadertoy also allows for loops like many other programming languages. I was surprised to see for loop at first. Because it is a pixel-based shader that is processed in parallel, it seems like it will not for loop somehow.
The result of the for loop is finalized on line 18 and puts the values in the 0, 1, and 2 places of the c array, respectively. If we look at line 20, we actually use the value vec4(c/l, t) in fragColor, which returns the color value. This is equivalent to vec4(c[0]/l, c[1]/l, c[2]/l, t). We can see that the reason 3 times of for loop was to calculate the RGB color value separately.
Lines 11-14 cover the boilerplate code we’ve seen so far. Note, however, that both uv and p are defined at the same time and are newly defined in the for loop. As we have seen above, the for loop calculates the RGB channels separately and also calculates the uv and p coordinates independently.
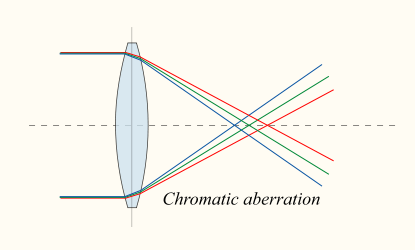
Line 15 adds .07 to time every time for loop. The R channel will be added to .07, the G channel to .14, and the B channel to .21. Have you ever experimented with color scattering through a prism? This is called chromatic aberration, and the line 15 reproduces it in a simple version. When you look at the still image of ‘Creation’, you can see that R, G, and B are arranged slightly differently as chromatic aberration effect.
Length (p) on line 16 computes the length of the p vector. You can also calculate length with distance. diatance computes the distance between two points, so length(p1 - p2) == distance(p1, p2) because the distance is the length. The length(p) here can be thought of as length(p - 0) == distance(p, 0). That is, the distance between the origin and p, or the area of a fuzzy circle centered on the origin.
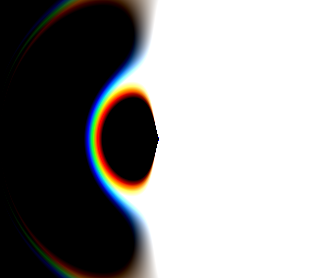
So, I will try to draw only the necessary code among the codes so far.
The inside is black and there is a circle that gets brighter as it goes outwards. You can also express this circle as a step by using step or floor. The core code of ‘Creation’ creates a beautiful pattern by changing this circle. I’ll see how to do that right now.
Line 17
Lines 17 and 18 are the core of this code. If you look at the elements of these two lines to see how this code works, you can unlock them. Or maybe you can read this blog post slowly with a cup of coffee.
uv+=p/l*(sin(z)+1.)*abs(sin(l*9.-z*2.));
Let’s start with line 17 first. The first thing that stands out is to finally use the saved uv. uv copies the value of p in line 12, then only p is calculated, and finally uv is used. uv has a value between 0.0 and 1.0.
This value is multiplied by p/l, sin(z)+1., and abs(sin(l*9.-z*2.)). It looks complicated, but let’s look at each one.
From the first paragraph, it is p/l. p is a value between -0.5~0.5, withe the middle (0,0) as the smallest xy value. This is divided by l. l is a black circle with the center in the above. To be black means to be small. Therefore, we can assume that this circle will have the largest value in the middle because the denominator is the smallest.
Then we will draw it once.
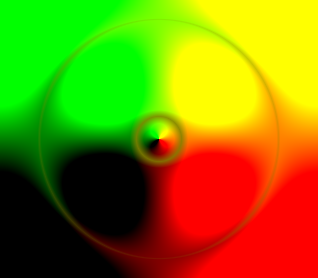
Line 12 shows the result of p/l once. Since p is vec2, it occupies the R and G channels among the 4 vectors that enter the final color. Because it shows the largest value in the middle as expected, the color is most pronounced in the center.
However, the colors in the x+ direction and the y+ direction around the origin are very distinct, so they seem to be close to 1. If we uncomment line 13 to check this, we can see that x of p/l is a large value close to 1.0 in the interval \(x \ge 0.0\) and \(y \simeq 0.0\). I did not understand this part at first, but in fact l=length(p), so l is the same value as px when it is p.y=0, Yes. (\(l = \sqrt{p.x^2+p.y^2}\)) And still have values close to 1 around the x+ axis where p.y is a very small value.
By uncommenting line 14, we can see this intuitively. On the x+, y+ axes, p/l has a value greater than 0.999.
Line 15 actually indicates what value will be added to uv by adding p/l. Uncommenting the 16th line will give you a more intuitive understanding of the range of values close to 1.
Let’s look at the second argument, sin(z)+1.. z is time, and we added the values of .07, .14, and .21 to the R, G, and B channels, respectively. sin outputs -1.0~1.0 value, whichever input it is, and adds 1 to output 0.0~2.0 value.
Let’s add the chromatic aberration later, and now multiply sin(time)+1. by p/l and add it to uv.
When time came in, a dynamic change occurred. p/l is added to uv from 0 to 2 times. This part is simple and does not seem to be much to explain.
The third term is abs(sin(l*9.-z*2.)). Let’s also calculate this by replacing z with time. I will explain one by one because the expression is complicated.
Once we put the length(p)*9. value into the RGB channel, we will see a very small black circle. Initially, the value of length(p) in the RGB channel is much smaller than in the circle. Small values are almost gone and mostly large ones.
If we uncomment line 13, we can see that only black screen is visible. Since time is a rapidly increasing value, the value of l will be negative in a moment and only black. So what if we uncomment line 14 on sin here?
Strangely, the disk pattern extends from the origin to the outside. Conversely, if you insert +time * 2. instead of -time * 2., you will see a disk pattern that goes into the origin. It is this pattern that looks like an endless stretch from the origin that can be seen in ‘Creation’.
We can adjust the thickness of each disk by changing 9 multiplied by length(p) to another value. The thinner the thickness, the slower the speed, the thicker the speed becomes faster. The 2 multiplied by -time is also a variable related to speed. The larger the number, the faster the speed. 60, we can see a screen of psychedelic atmosphere.
Line 15 takes abs in this expression and changes the range to 0.0~1.0. You can see that the dark part of the ring is thinner and the bright part is stretched.
Now multiply these three terms on line 17 and add them to uv. If you release the annotation, you can see that the wave that spreads out from the origin appears and disappears. (Note: On line 17, we used length (p) instead of l to prevent the variable from being corrupted.) It seems to be just fine, but now it’s time to unlock the last secret in line 18 and make the principles of this code entirely ours.
 This is what happens when we uncomment the last line.
Line 18
It is also complex here too.
c[i]=.01/length(abs(mod(uv,1.)-.5));
Let’s solve them one by one. Once you finally have a value in the c array, you’ll have to implement a for loop that you put off. And from the inside, you can see mod(uv, 1.).
mod(a, b) is the remainder of a divided by b. If b is 1, the mod value will be 0, if it is an integer, but it will be a decimal point if the float number in shader. This reminds us of the fract we saw when calculating pseudo-random values. In fact, mod(x, 1.) is equivalent to fract(x). In the above graph, we can uncomment line 2 to see that both expressions have the same value.
And if you give -.5 here, the range will be -0.5~0.5 and abs will be 0.0~0.5. You can follow this operation by uncommenting lines 3 and 4. When it comes to line 4, the graph becomes a mountain shape with repeated triangles.
Since the original value is uv, I will draw a shader of what it looks like when I do this operation on a uv which has nothing.
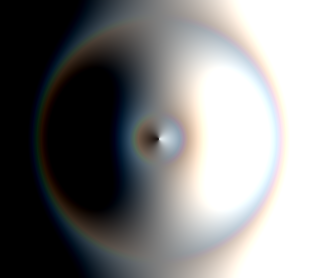
If we put abs(mod(uv,1.)-.5) on the R and G channels, we can see a screen that is dark inside and bright outside. Since the original uv range is 0.0~1.0, if you see that the values in the above graph start at 0.5 and go to 0 and go back to 0.5, you will see that the colors are arranged on the screen like this.
If you then uncomment line 13, you will see a black circle that is slightly pushed down depending on the screen size. This is because uv does not deal with aspect ratios (resolution.x/resolution.y multiplication) unlike p. This disparity adds visual richness by having a slightly pressed ellipse appear in the middle of the ‘Creation’ animation.
If we uncomment line 14, we can see a very small red circle. Since the existing value is multiplied by the reciprocal and only the small value .01 is left in the numerator, it is larger than 0, so the area of the visible value is very small.
Now, to interpret what line 18 means to the information we have gathered so far, this code creates a very narrow elliptical region. However, this narrow elliptical region is based on the uv received on line 17, so it can be spread out from the origin in disk form. Now, finally, combining the 17th and 18th lines will reproduce ‘Creation’.
After adding .07 to time through for loop, I put only one value of uv into c[i]=uv.x;. We can see that the chromatic aberration effect described above is faint. The chromatic aberration effect is best seen especially when the wave starts to shrink as it gets bigger.
 Initial setting(Line 18, 21 are commented)
Let’s uncomment line 21. Line 20 puts the c value in the RGB channel, but ‘Creation’ puts c/l at the end like line 21. Since l=length(p) is a larger value going outward, we can see that if you divide it by c, the blurred part of the image disappears and the contrast becomes clear. And the effect of chromatic aberration becomes stronger.
 Uncomment line 21(line 18 is commented)
Comment out line 21 again, and uncomment line 18, we will notice that the RGB small dots, which represent the chromatic aberration effect, are spread out from the origin. Line 18 has the effect of bringing the image into a small ellipse, as shown above, but the uv, which calculates line 18, is also shifted outward by the z value based on time.
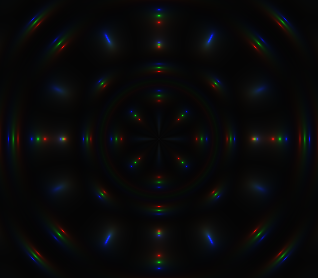 Uncomment line 18(line 21 is commented)
Now, when we finally uncomment the 21st line, we can see that the small points grow bigger. Because l is a very small value around the origin, the value divided by this value becomes large. As a result, the overall size of the light spot will increase and the detail will be reproduced.
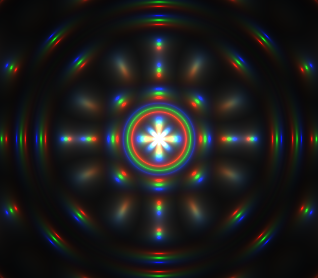 Uncomment all(final)
This completes the analysis of ‘Creation’. I will come back with wonderful images next time. Thank you for reading the long story.